服务器开发者指南
在本教程中,我们将构建一个简单的MCP天气服务器并将其连接到主机(Claude桌面版)。我们将从基本设置开始,然后逐步过渡到更复杂的用例。
我们将构建什么
目前许多LLM无法获取天气预报和严重天气警报。让我们使用MCP来解决这个问题!
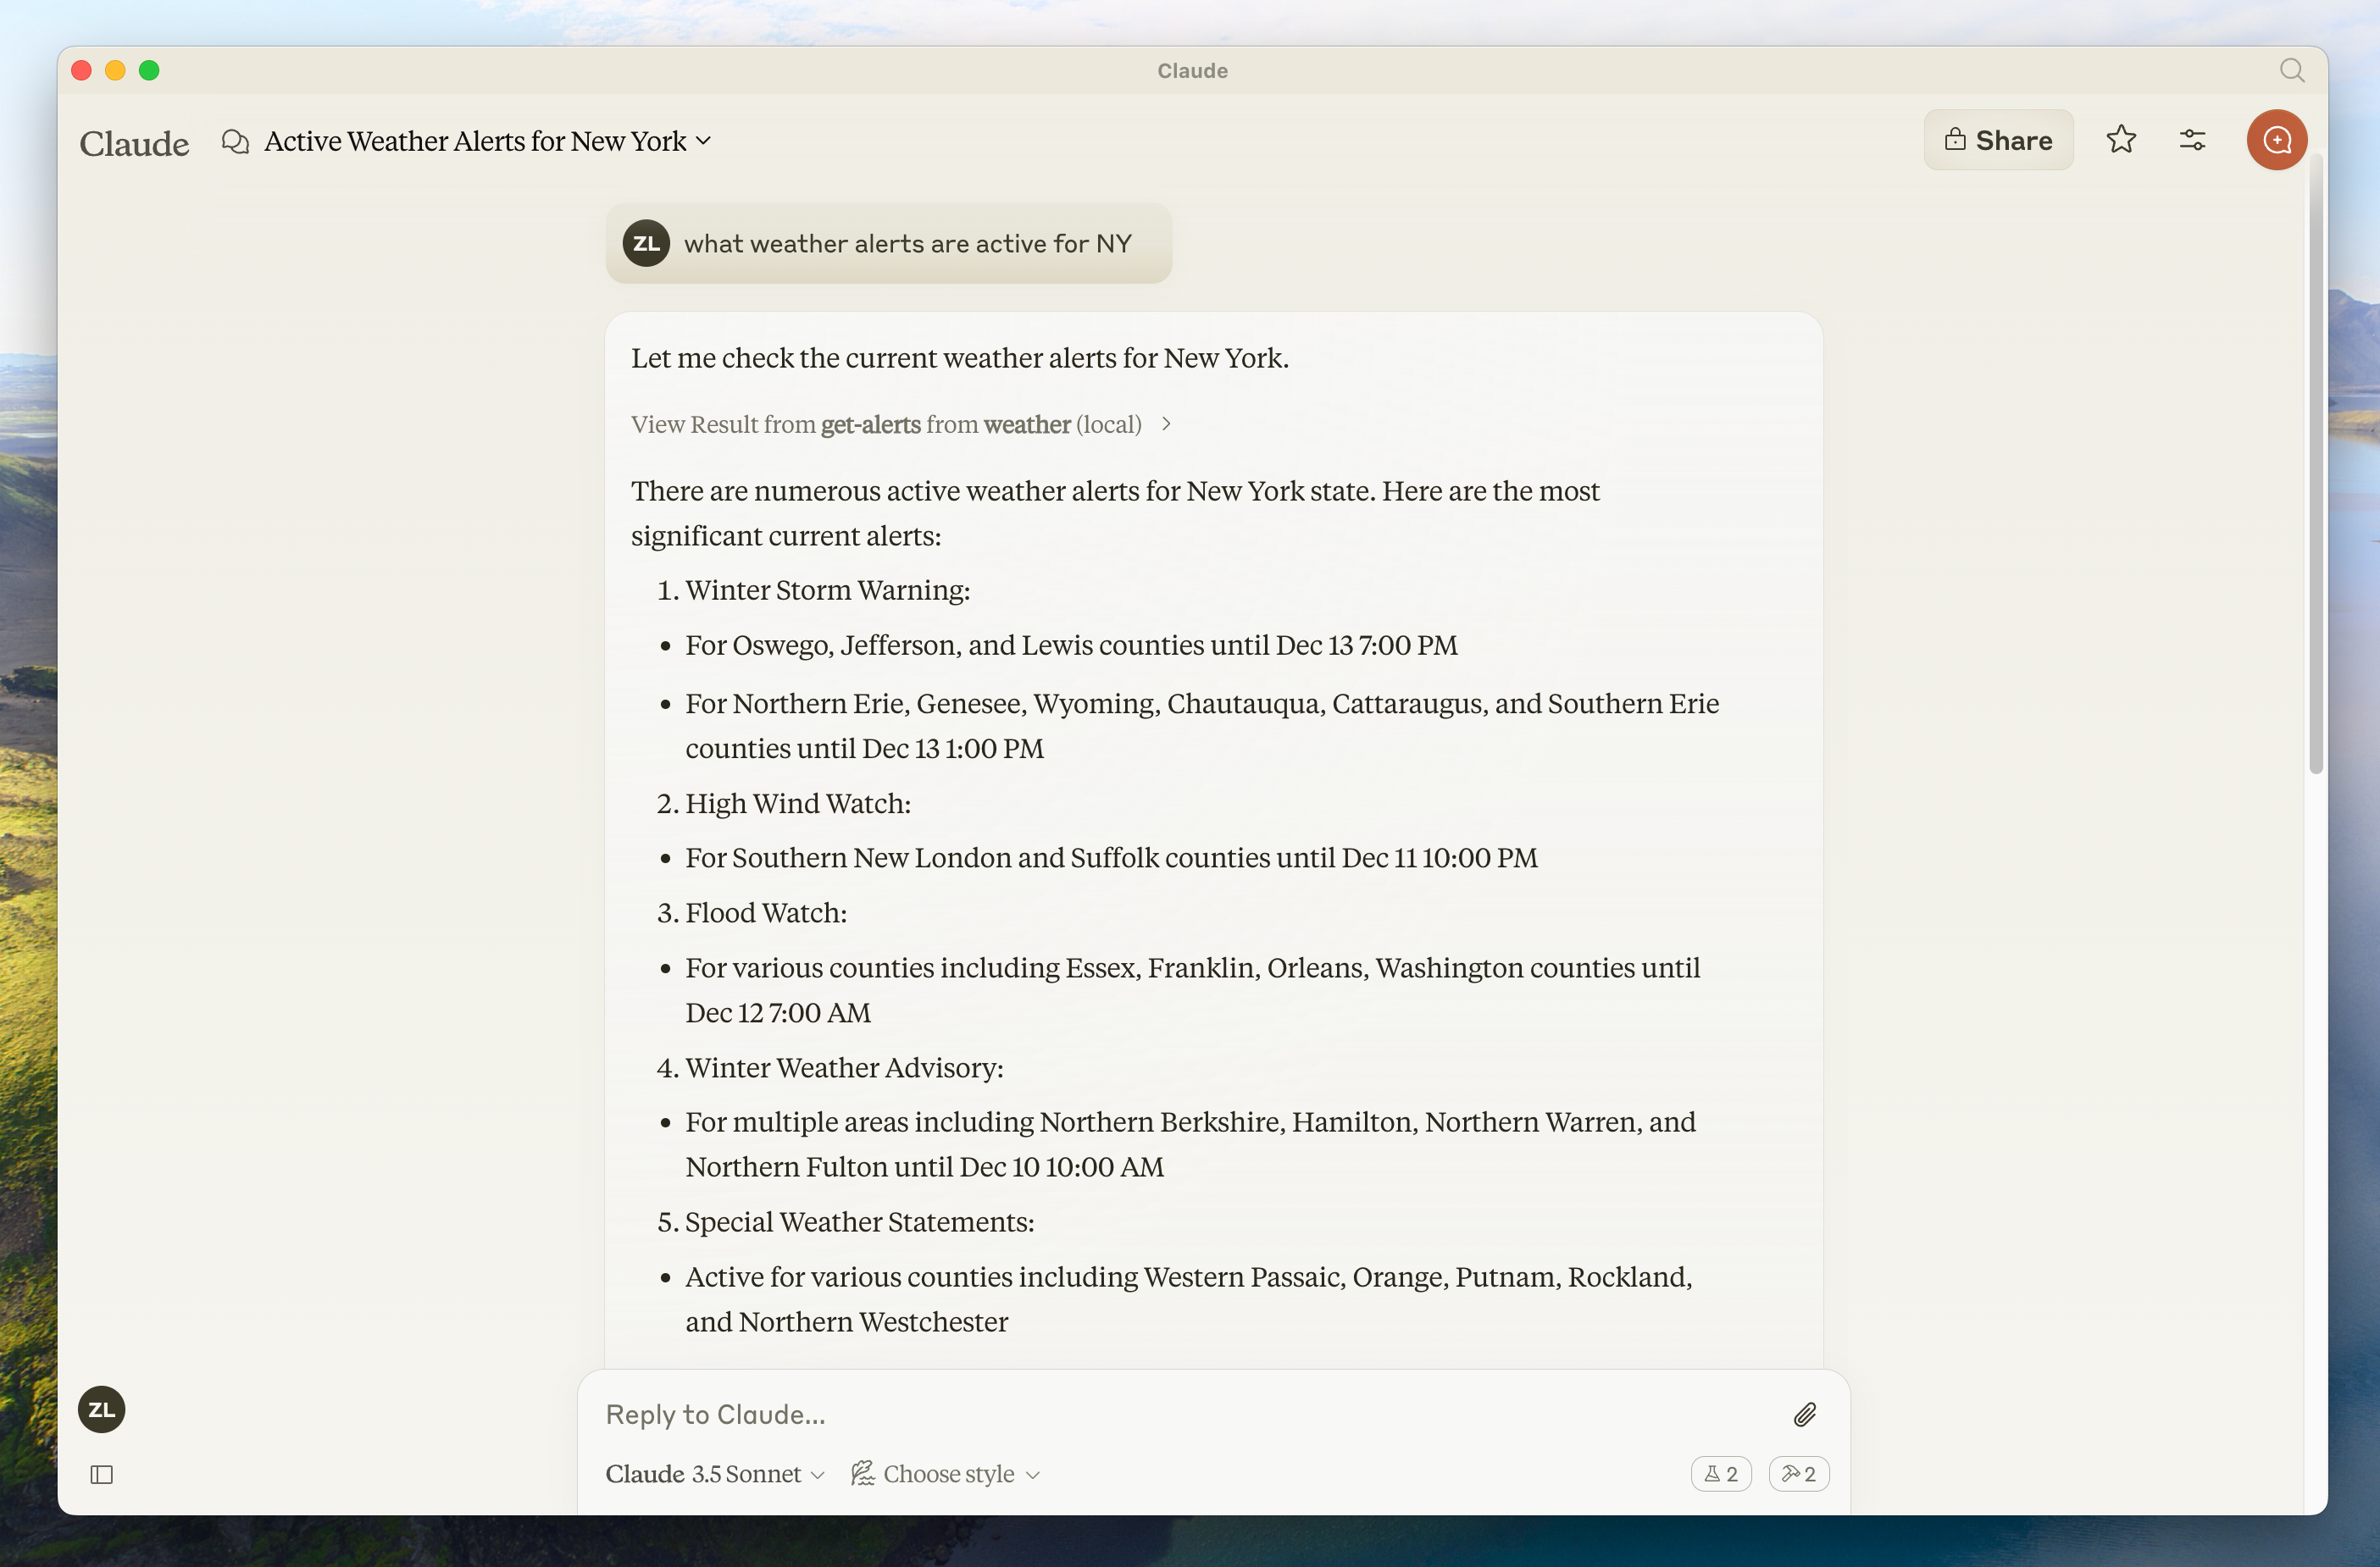
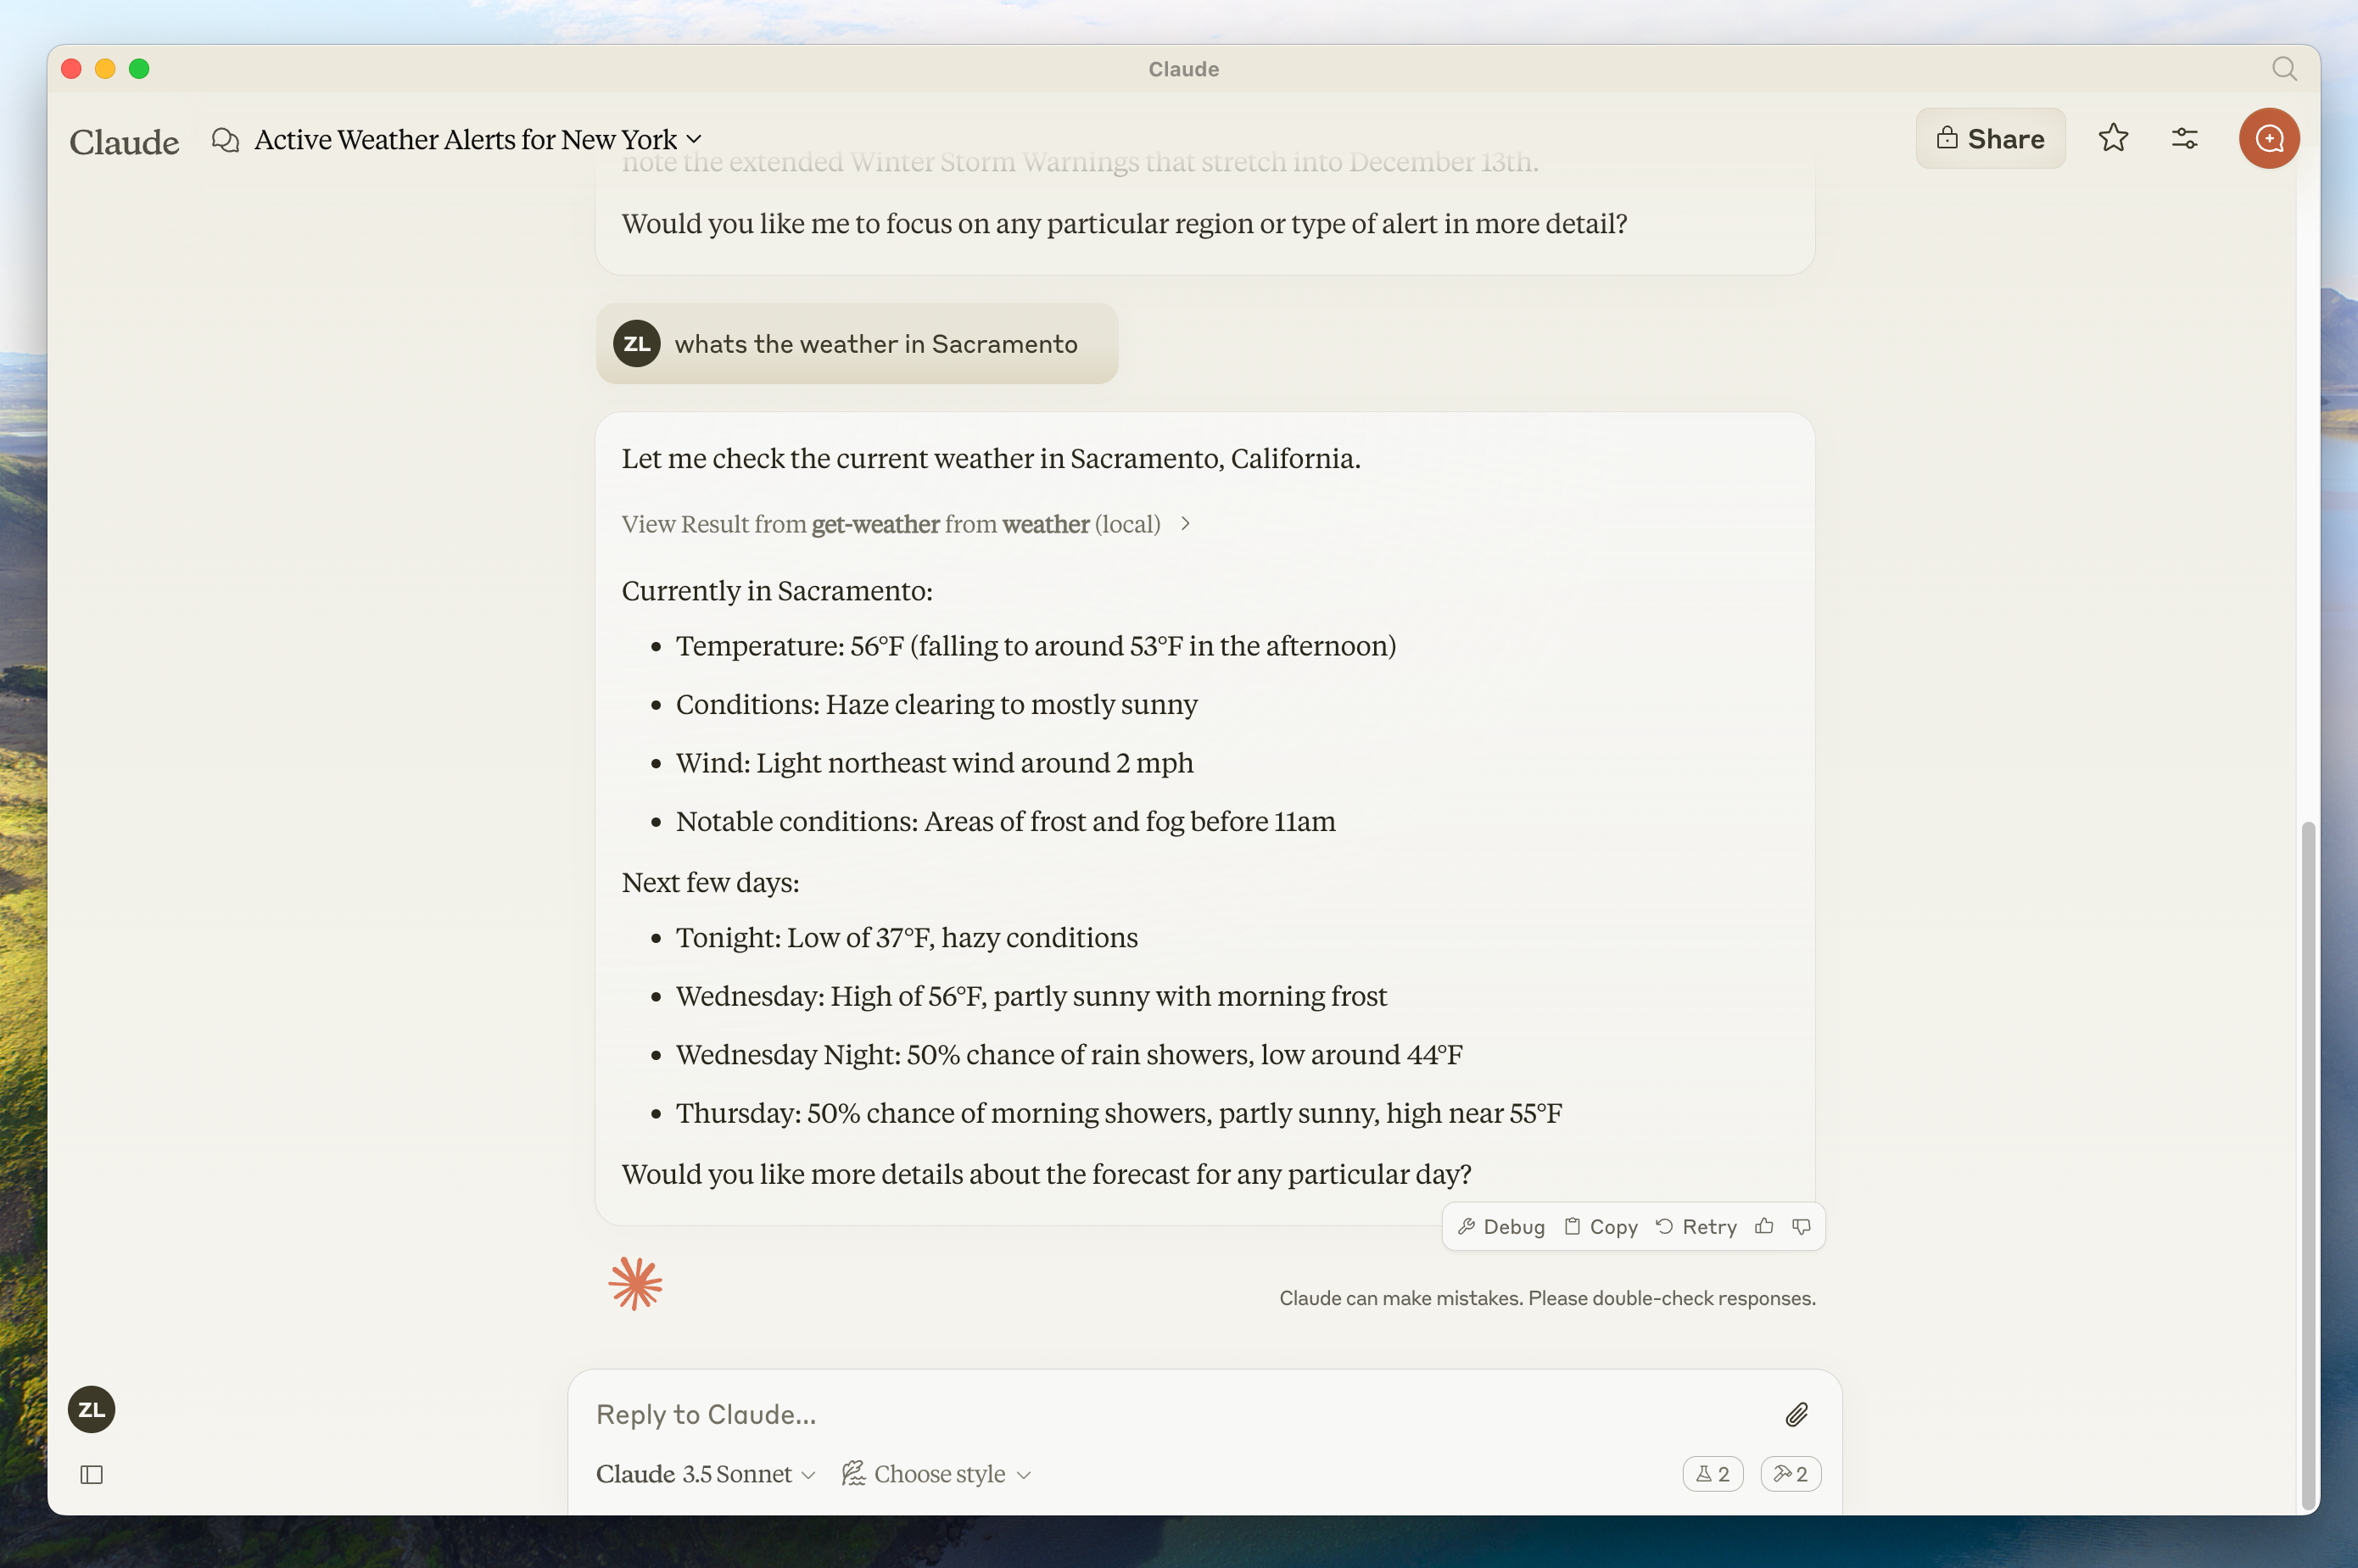
我们将构建一个提供两个工具的服务器:get-alerts和get-forecast。然后我们将服务器连接到MCP主机(在本例中是Claude桌面版):
为什么选择Claude桌面版而不是Claude.ai?
因为服务器是本地运行的,MCP目前只支持桌面主机。远程主机正在积极开发中。
MCP核心概念
MCP服务器可以提供三种主要类型的功能:
- 资源:客户端可以读取的文件类数据(如API响应或文件内容)
- 工具:LLM可以调用的函数(需要用户批准)
- 提示:帮助用户完成特定任务的预写模板
本教程将主要关注工具。
- Python
- Node
- Java
- Kotlin
- C#
让我们开始构建我们的天气服务器!你可以在这里找到我们将要构建的完整代码。
预备知识
本快速入门假设你熟悉:
- Python
- 像Claude这样的LLM
系统要求
- 已安装Python 3.10或更高版本
- 你必须使用Python MCP SDK 1.2.0或更高版本
设置环境
首先,让我们安装uv并设置我们的Python项目和环境:
curl -LsSf https://astral.sh/uv/install.sh | sh
powershell -ExecutionPolicy ByPass -c "irm https://astral.sh/uv/install.ps1 | iex"
安装后请确保重启终端,以确保uv命令被正确识别。
现在,让我们创建并设置我们的项目:
# 为我们的项目创建一个新目录
uv init weather
cd weather
# 创建虚拟环境并激活它
uv venv
source .venv/bin/activate
# 安装依赖
uv add "mcp[cli]" httpx
# 创建我们的服务器��文件
touch weather.py
# 为我们的项目创建一个新目录
uv init weather
cd weather

# 创建虚拟环境并激活它
uv venv
.venv\Scripts\activate

# 安装依赖
uv add mcp[cli] httpx

# 创建我们的服务器文件
new-item weather.py
现在让我们开始构建你的服务器。
构建服务器
导入包并设置实例
将这些添加到你的weather.py顶部:
from typing import Any
import httpx
from mcp.server.fastmcp import FastMCP

# 初始化FastMCP服务器
mcp = FastMCP("weather")

# 常量
NWS_API_BASE = "https://api.weather.gov"
USER_AGENT = "weather-app/1.0"
FastMCP类使用Python类型提示和文档字符串来自动生成工具定义,使创建和维护MCP工具变得容易。
辅助函数
接下来,让我们添加用于查询和格式化国家气象局API数据的辅助函数:
async def make_nws_request(url: str) -> dict[str, Any] | None:
    """向NWS API发送请求并处理错误。"""
    headers = {
        "User-Agent": USER_AGENT,
        "Accept": "application/geo+json"
    }
    async with httpx.AsyncClient() as client:
        try:
            response = await client.get(url, headers=headers, timeout=30.0)
            response.raise_for_status()
            return response.json()
        except Exception:
            return None

def format_alert(feature: dict) -> str:
    """将警报特性格式化为可读字符串。"""
    props = feature["properties"]
    return f"""
事件: {props.get('event', '未知')}
地区: {props.get('areaDesc', '未知')}
严重程度: {props.get('severity', '未知')}
描述: {props.get('description', '无描述可用')}
指示: {props.get('instruction', '未提供具体指示')}
"""
实现工具执行
工具执行处理程序负责实际执行每个工具的逻辑。让我们添加它:
@mcp.tool()
async def get_alerts(state: str) -> str:
    """获取美国某个州的天气警报。

    Args:
        state: 两字母的美国州代码(例如CA、NY)
    """
    url = f"{NWS_API_BASE}/alerts/active/area/{state}"
    data = await make_nws_request(url)

    if not data or "features" not in data:
        return "无法获取警报或未找到警报。"

    if not data["features"]:
        return "该州没有活动警报。"

    alerts = [format_alert(feature) for feature in data["features"]]
    return "\n---\n".join(alerts)

@mcp.tool()
async def get_forecast(latitude: float, longitude: float) -> str:
    """获取某个位置的天气预报。

    Args:
        latitude: 位置的纬度
        longitude: 位置的经度
    """
    # 首先获取预报网格端点
    points_url = f"{NWS_API_BASE}/points/{latitude},{longitude}"
    points_data = await make_nws_request(points_url)

    if not points_data:
        return "无法获取该位置的预报数据。"

    # 从points响应中获取预报URL
    forecast_url = points_data["properties"]["forecast"]
    forecast_data = await make_nws_request(forecast_url)

    if not forecast_data:
        return "无法获取详细预报。"

    # 将时段格式化为可读预报
    periods = forecast_data["properties"]["periods"]
    forecasts = []
    for period in periods[:5]:  # 只显示接下来的5个时段
        forecast = f"""
{period['name']}:
温度: {period['temperature']}°{period['temperatureUnit']}
风: {period['windSpeed']} {period['windDirection']}
预报: {period['detailedForecast']}
"""
        forecasts.append(forecast)

    return "\n---\n".join(forecasts)
运行服务器
最后,让我们初始化和运行服务器:
if __name__ == "__main__":
    # 初始化并运行服务器
    mcp.run(transport='stdio')
你的服务器已经完成!运行uv run weather.py来确认一切正常工作。
让我们现在从现有的MCP主机(Claude桌面版)测试你的服务器。
使用Claude桌面版测试服务器
Claude桌面版目前还不支持Linux。Linux用户可以继续学习构建客户端教程,构建一个连接到我们刚刚构建的服务器的MCP客户端。
首先,确保你已安装Claude桌面版。你可以在这里安装最新版本。如果你已经安装了Claude桌面版,请确保它已更新到最新版本。
我们需要为你想使用的MCP服务器配置Claude桌面版。为此,在文本编辑器中打开你的Claude桌面版App配置文件~/Library/Application Support/Claude/claude_desktop_config.json。如果文件不存在,请确保创建它。
例如,如果你安装了VS Code:
- MacOS/Linux
- Windows
code ~/Library/Application\ Support/Claude/claude_desktop_config.json
code $env:AppData\Claude\claude_desktop_config.json
然后你将在mcpServers键中添加你的服务器。只有在至少正确配置了一个服务器时,MCP UI元素才会在Claude桌面版中显示。
在这种情况下,我们将添加我们的单个天气服务器,如下所示:
- MacOS/Linux
- Windows
{
    "mcpServers": {
        "weather": {
            "command": "uv",
            "args": [
                "--directory",
                "/ABSOLUTE/PATH/TO/PARENT/FOLDER/weather",
                "run",
                "weather.py"
            ]
        }
    }
}
{
    "mcpServers": {
        "weather": {
            "command": "uv",
            "args": [
                "--directory",
                "C:\\ABSOLUTE\\PATH\\TO\\PARENT\\FOLDER\\weather",
                "run",
                "weather.py"
            ]
        }
    }
}
你可能需要在command字段中放入uv可执行文件的完整路径。你可以通过在MacOS/Linux上运行which uv或在Windows上运行where uv来获取这个路径。
确保你传入服务器的绝对路径。
这告诉Claude桌面版:
- 有一个名为"weather"的MCP服务器
- 通过运行
uv --directory /ABSOLUTE/PATH/TO/PARENT/FOLDER/weather run weather.py来启动它
保存文件,然后重启Claude桌面版。
让我们开始构建我们的天气服务器!你可以在这里找到我们将要构建的完整代码。
预备知识
本快速入门假设你熟悉:
- TypeScript
- 像Claude这样的LLM
系统要求
对于TypeScript,确保你已安装最新版本的Node。
设置环境
首先,如果你还没有安装Node.js和npm,请从nodejs.org下载它们。 验证你的Node.js安装:
node --version
npm --version
对于本教程,你需要Node.js 16或更高版本。
现在,让我们创建并设置我们的项目:
# 为我们的项目创建一个新目录
mkdir weather
cd weather

# 初始化一个新的npm项目
npm init -y

# 安装依赖
npm install @modelcontextprotocol/sdk zod
npm install -D @types/node typescript

# 创建我们的文件
mkdir src
touch src/index.ts
# 为我们的项目创建一个新目录
md weather
cd weather

# 初始化一个新的npm项目
npm init -y

# 安装依赖
npm install @modelcontextprotocol/sdk zod
npm install -D @types/node typescript

# 创建我们的文件
md src
new-item src\index.ts
更新你的package.json以添加type: "module"和构建脚本:
{
  "type": "module",
  "bin": {
    "weather": "./build/index.js"
  },
  "scripts": {
    "build": "tsc && chmod 755 build/index.js"
  },
  "files": [
    "build"
  ],
}
在项目根目录创建tsconfig.json:
{
  "compilerOptions": {
    "target": "ES2022",
    "module": "Node16",
    "moduleResolution": "Node16",
    "outDir": "./build",
    "rootDir": "./src",
    "strict": true,
    "esModuleInterop": true,
    "skipLibCheck": true,
    "forceConsistentCasingInFileNames": true
  },
  "include": ["src/**/*"],
  "exclude": ["node_modules"]
}
现在让我们开始构建你的服务器。
构建服务器
导入包并设置实例
将这些添加到你的src/index.ts顶部:
import { McpServer } from "@modelcontextprotocol/sdk/server/mcp.js";
import { StdioServerTransport } from "@modelcontextprotocol/sdk/server/stdio.js";
import { z } from "zod";

const NWS_API_BASE = "https://api.weather.gov";
const USER_AGENT = "weather-app/1.0";

// 创建服务器实例
const server = new McpServer({
  name: "weather",
  version: "1.0.0",
  capabilities: {
    resources: {},
    tools: {},
  },
});
辅助函数
接下来,让我们添加用于查询和格式化国家气象局API数据的辅助函数:
// 用于发送NWS API请求的辅助函数
async function makeNWSRequest<T>(url: string): Promise<T | null> {
  const headers = {
    "User-Agent": USER_AGENT,
    Accept: "application/geo+json",
  };

  try {
    const response = await fetch(url, { headers });
    if (!response.ok) {
      throw new Error(`HTTP error! status: ${response.status}`);
    }
    return (await response.json()) as T;
  } catch (error) {
    console.error("Error making NWS request:", error);
    return null;
  }
}

interface AlertFeature {
  properties: {
    event?: string;
    areaDesc?: string;
    severity?: string;
    status?: string;
    headline?: string;
  };
}

// 格式化警报数据
function formatAlert(feature: AlertFeature): string {
  const props = feature.properties;
  return [
    `事件: ${props.event || "未知"}`,
    `地区: ${props.areaDesc || "未知"}`,
    `严重程度: ${props.severity || "未知"}`,
    `状态: ${props.status || "未知"}`,
    `标题: ${props.headline || "无标题"}`,
    "---",
  ].join("\n");
}

interface ForecastPeriod {
  name?: string;
  temperature?: number;
  temperatureUnit?: string;
  windSpeed?: string;
  windDirection?: string;
  shortForecast?: string;
}

interface AlertsResponse {
  features: AlertFeature[];
}

interface ForecastResponse {
  properties: {
    periods: ForecastPeriod[];
  };
}
实现工具执行
现在让我们实现工具执行处理程序:
// 实现get-alerts工具
server.addTool({
  name: "get-alerts",
  description: "获取美国某个州的天气警报",
  parameters: z.object({
    state: z.string().describe("两字母的美国州代码(例如CA、NY)"),
  }),
  handler: async ({ state }) => {
    const url = `${NWS_API_BASE}/alerts/active/area/${state}`;
    const data = await makeNWSRequest<AlertsResponse>(url);

    if (!data || !data.features) {
      return "无法获取警报或未找到警报。";
    }

    if (data.features.length === 0) {
      return "该州没有活动警报。";
    }

    return data.features.map(formatAlert).join("\n");
  },
});

// 实现get-forecast工具
server.addTool({
  name: "get-forecast",
  description: "获取某个位置的天气预报",
  parameters: z.object({
    latitude: z.number().describe("位置的纬度"),
    longitude: z.number().describe("位置的经度"),
  }),
  handler: async ({ latitude, longitude }) => {
    // 首先获取预报网格端点
    const pointsUrl = `${NWS_API_BASE}/points/${latitude},${longitude}`;
    const pointsData = await makeNWSRequest<{ properties: { forecast: string } }>(pointsUrl);

    if (!pointsData) {
      return "无法获取该位置的预报数据。";
    }

    // 获取预报URL并获取详细预报
    const forecastUrl = pointsData.properties.forecast;
    const forecastData = await makeNWSRequest<ForecastResponse>(forecastUrl);

    if (!forecastData) {
      return "无法获取详细预报。";
    }

    // 格式化预报数据
    const periods = forecastData.properties.periods;
    return periods
      .slice(0, 5) // 只显示接下来的5个时段
      .map(
        (period) =>
          `${period.name}:\n温度: ${period.temperature}°${period.temperatureUnit}\n风: ${period.windSpeed} ${period.windDirection}\n预报: ${period.shortForecast}`
      )
      .join("\n---\n");
  },
});
运行服务器
最后,让我们初始化和运行服务器:
// 初始化并运行服务器
const transport = new StdioServerTransport();
server.run(transport);
你的服务器已经完成!运行以下命令来构建和启动服务器:
npm run build
node build/index.js
让我们现在从现有的MCP主机(Claude桌面版)测试你的服务器。
使用Claude桌面版测试服务器
Claude桌面版目前还不支持Linux。Linux用户可以继续学习构建客户端教程,构建一个连接到我们刚刚构建的服务器的MCP客户端。
首先,确保你已安装Claude桌面版。你可以在这里安装最新版本。如果你已经安装了Claude桌面版,请确保它已更新到最新版本。
我们需要为你想使用的MCP服务器配置Claude桌面版。为此,在文本编辑器中打开你的Claude桌面版App配置文件~/Library/Application Support/Claude/claude_desktop_config.json。如果文件不存在,请确保创建它。
例如,如果你安装了VS Code:
- MacOS/Linux
- Windows
code ~/Library/Application\ Support/Claude/claude_desktop_config.json
code $env:AppData\Claude\claude_desktop_config.json
然后你将在mcpServers键中添加你的服务器。只有在至少正确配置了一个服务器时,MCP UI元素才会在Claude桌面版中显示。
在这种情况下,我们将添加我们的单个天气服务器,如下所示:
- MacOS/Linux
- Windows
{
    "mcpServers": {
        "weather": {
            "command": "node",
            "args": [
                "--directory",
                "/ABSOLUTE/PATH/TO/PARENT/FOLDER/weather",
                "build/index.js"
            ]
        }
    }
}
{
    "mcpServers": {
        "weather": {
            "command": "node",
            "args": [
                "--directory",
                "C:\\ABSOLUTE\\PATH\\TO\\PARENT\\FOLDER\\weather",
                "build/index.js"
            ]
        }
    }
}
你可能需要在command字段中放入node可执行文件的完整路径。你可以通过在MacOS/Linux上运行which node或在Windows上运行where node来获取这个路径。
确保你传入服务器的绝对路径。
这告诉Claude桌面版:
- 有一个名为"weather"的MCP服务器
- 通过运行
node --directory /ABSOLUTE/PATH/TO/PARENT/FOLDER/weather build/index.js来启动它
保存文件,然后重启Claude桌面版。
这是一个基于Spring AI MCP自动配置和boot starter的快速入门演示。 要了解如何手动创建同步和异步MCP服务器,请参阅Java SDK服务器文档。
让我们开始构建我们的天气服务器! 你可以在这里找到我们将要构建的完整代码。
更多信息,请参见MCP服务器Boot Starter参考文档。 对于手动MCP服务器实现,请参阅MCP服务器Java SDK文档。
系统要求
- 已安装Java 17或更高版本
- Spring Boot 3.3.x或更高版本
设置环境
使用Spring Initializer来引导项目。
你需要添加以下依赖:
- Maven
- Gradle
<dependencies>
      <dependency>
          <groupId>org.springframework.ai</groupId>
          <artifactId>spring-ai-starter-mcp-server</artifactId>
      </dependency>

      <dependency>
          <groupId>org.springframework</groupId>
          <artifactId>spring-web</artifactId>
      </dependency>
</dependencies>
dependencies {
  implementation platform("org.springframework.ai:spring-ai-starter-mcp-server")
  implementation platform("org.springframework:spring-web")
}
然后通过设置应用程序属性来配置你的应用程序:
spring.main.bannerMode=off
logging.pattern.console=
logging:
  pattern:
    console:
spring:
  main:
    banner-mode: off
服务器配置属性文档列出了所有可用的属性。
现在让我们开始构建你的服务器。
构建服务器
天气服务
让我们实现一个WeatherService.java,它使用REST客户端从国家气象局API查询数据:
@Service
public class WeatherService {

    private final RestClient restClient;

    public WeatherService() {
        this.restClient = RestClient.builder()
            .baseUrl("https://api.weather.gov")
            .defaultHeader("Accept", "application/geo+json")
            .defaultHeader("User-Agent", "WeatherApiClient/1.0 (your@email.com)")
            .build();
    }

    @Tool(description = "获取特定纬度/经度的天气预报")
    public String getWeatherForecastByLocation(
        double latitude,   // 纬度坐标
        double longitude   // 经度坐标
    ) {
        // 返回详细预报,包括:
        // - 温度和单位
        // - 风速和方向
        // - 详细预报描述
    }

    @Tool(description = "获取美国某个州的天气警报")
    public String getAlerts(
        @ToolParam(description = "两字母美国州代码(例如CA、NY") String state)
    ) {
        // 返回活动警报,包括:
        // - 事件类型
        // - 受影响地区
        // - 严重程度
        // - 描述
        // - 安全指示
    }

    // ......
}
@Service注解会自动在应用程序上下文中注册服务。
Spring AI的@Tool注解使创建和维护MCP工具变得容易。
自动配置将自动将这些工具注册到MCP服务器。
创建你的Boot应用程序
@SpringBootApplication
public class McpServerApplication {

    public static void main(String[] args) {
        SpringApplication.run(McpServerApplication.class, args);
    }

    @Bean
    public ToolCallbackProvider weatherTools(WeatherService weatherService) {
        return  MethodToolCallbackProvider.builder().toolObjects(weatherService).build();
    }
}
使用MethodToolCallbackProvider工具将@Tools转换为MCP服务器使用的可执行回调。
运行服务器
最后,让我们构建服务器:
./mvnw clean install
这将在target文件夹中生成一个mcp-weather-stdio-server-0.0.1-SNAPSHOT.jar文件。
让我们现在从现有的MCP主机(Claude桌面版)测试你的服务器。
使用Claude桌面版测试服务器
Claude桌面版目前还不支持Linux。
首先,确保你已安装Claude桌面版。 你可以在这里安装最新版本。如果你已经安装了Claude桌面版,请确保它已更新到最新版本。
我们需要为你想使用的MCP服务器配置Claude桌面版。
为此,在文本编辑器中打开你的Claude桌面版App配置文件~/Library/Application Support/Claude/claude_desktop_config.json。
如果文件不存在,请确保创建它。
例如,如果你安装了VS Code:
- MacOS/Linux
- Windows
code ~/Library/Application\ Support/Claude/claude_desktop_config.json
code $env:AppData\Claude\claude_desktop_config.json
然后你将在mcpServers键中添加你的服务器。
只有在至少正确配置了一个服务器时,MCP UI元素才会在Claude桌面版中显示。
在这种情况下,我们将添加我们的单个天气服务器,如下所示:
- MacOS/Linux
- Windows
{
  "mcpServers": {
    "spring-ai-mcp-weather": {
      "command": "java",
      "args": [
        "-Dspring.ai.mcp.server.stdio=true",
        "-jar",
        "/ABSOLUTE/PATH/TO/PARENT/FOLDER/mcp-weather-stdio-server-0.0.1-SNAPSHOT.jar"
      ]
    }
  }
}
{
  "mcpServers": {
    "spring-ai-mcp-weather": {
      "command": "java",
      "args": [
        "-Dspring.ai.mcp.server.transport=STDIO",
        "-jar",
        "C:\\ABSOLUTE\\PATH\\TO\\PARENT\\FOLDER\\weather\\mcp-weather-stdio-server-0.0.1-SNAPSHOT.jar"
      ]
    }
  }
}
确保你传入服务器的绝对路径。
这告诉Claude桌面版:
- 有一个名为"my-weather-server"的MCP服务器
- 通过运行
java -jar /ABSOLUTE/PATH/TO/PARENT/FOLDER/mcp-weather-stdio-server-0.0.1-SNAPSHOT.jar来启动它
保存文件,然后重启Claude桌面版。
使用Java客户端测试服务器
手动创建MCP客户端
使用McpClient连接到服务器:
var stdioParams = ServerParameters.builder("java")
  .args("-jar", "/ABSOLUTE/PATH/TO/PARENT/FOLDER/mcp-weather-stdio-server-0.0.1-SNAPSHOT.jar")
  .build();

var stdioTransport = new StdioClientTransport(stdioParams);

var mcpClient = McpClient.sync(stdioTransport).build();

mcpClient.initialize();

ListToolsResult toolsList = mcpClient.listTools();
调用工具:
CallToolResult weather = mcpClient.callTool(
  new CallToolRequest("getWeatherForecastByLocation",
      Map.of("latitude", "47.6062", "longitude", "-122.3321")));

CallToolResult alert = mcpClient.callTool(
  new CallToolRequest("getAlerts", Map.of("state", "NY")));

mcpClient.closeGracefully();
使用MCP客户端Boot Starter
使用spring-ai-starter-mcp-client依赖创建一个新的boot starter应用程序:
<dependency>
    <groupId>org.springframework.ai</groupId>
    <artifactId>spring-ai-starter-mcp-client</artifactId>
</dependency>
并将spring.ai.mcp.client.stdio.servers-configuration属性设置为指向你的claude_desktop_config.json。
你可以重用现有的Anthropic Desktop配置:
spring.ai.mcp.client.stdio.servers-configuration=file:PATH/TO/claude_desktop_config.json
当你启动客户端应用程序时,自动配置将从claude_desktop_config.json自动创建MCP客户端。
更多信息,请参见MCP客户端Boot Starters参考文档。
更多Java MCP服务器示例
starter-webflux-server演示了如何使用SSE传输创建MCP服务器。 它展示了如何使用Spring Boot的自动配置功能定义和注册MCP工具、资源和提示。
这是一个基于Spring AI MCP自动配置和boot starter的快速入门演示。 要了解如何手动创建同步和异步MCP服务器,请参阅Java SDK服务器文档。
让我们开始构建我们的天气服务器! 你可以在这里找到我们将要构建的完整代码。
更多信息,请参见MCP服务器Boot Starter参考文档。 对于手动MCP服务器实现,请参阅MCP服务器Java SDK文档。
系统要求
- 已安装Java 17或更高版本
- Spring Boot 3.3.x或更高版本
设置环境
使用Spring Initializer来引导项目。
你需要添加以下依赖:
- Maven
- Gradle
<dependencies>
      <dependency>
          <groupId>org.springframework.ai</groupId>
          <artifactId>spring-ai-starter-mcp-server</artifactId>
      </dependency>

      <dependency>
          <groupId>org.springframework</groupId>
          <artifactId>spring-web</artifactId>
      </dependency>
</dependencies>
dependencies {
  implementation platform("org.springframework.ai:spring-ai-starter-mcp-server")
  implementation platform("org.springframework:spring-web")
}
然后通过设置应用程序属性来配置你的应用程序:
spring.main.bannerMode=off
logging.pattern.console=
logging:
  pattern:
    console:
spring:
  main:
    banner-mode: off
服务器配置属性�文档列出了所有可用的属性。
现在让我们开始构建你的服务器。
构建服务器
天气服务
让我们实现一个WeatherService.kt,它使用REST客户端从国家气象局API查询数据:
@Service
class WeatherService {

    private val restClient = RestClient.builder()
        .baseUrl("https://api.weather.gov")
        .defaultHeader("Accept", "application/geo+json")
        .defaultHeader("User-Agent", "WeatherApiClient/1.0 (your@email.com)")
        .build()

    @Tool(description = "获取特定纬度/经度的天气预报")
    fun getWeatherForecastByLocation(
        latitude: Double,   // 纬度坐标
        longitude: Double   // 经度坐标
    ): String {
        // 返回详细预报,包括:
        // - 温度和单位
        // - 风速和方向
        // - 详细预报描述
    }

    @Tool(description = "获取美国某个州的天气警报")
    fun getAlerts(
        @ToolParam(description = "两字母美国州代码(例如CA、NY") state: String
    ): String {
        // 返回活动警报,包括:
        // - 事件类型
        // - 受影响地区
        // - 严重程度
        // - 描述
        // - 安全指示
    }

    // ......
}
@Service注解会自动在应用程序上下文中注册服务。
Spring AI的@Tool注解使创建和维护MCP工具变得容易。
自动配置将自动将这些工具注册到MCP服务器。
创建你的Boot应用程序
@SpringBootApplication
class McpServerApplication {

    @Bean
    fun weatherTools(weatherService: WeatherService): ToolCallbackProvider {
        return MethodToolCallbackProvider.builder().toolObjects(weatherService).build()
    }
}

fun main(args: Array<String>) {
    SpringApplication.run(McpServerApplication::class.java, *args)
}
使用MethodToolCallbackProvider工具将@Tools转换为MCP服务器使用的可执行回调。
运行服务器
最后,让我们构建服务器:
./gradlew clean build
这将在build/libs文件夹中生成一个mcp-weather-stdio-server-0.0.1-SNAPSHOT.jar文件。
让我们现在从现有的MCP主机(Claude桌面版)测试你的服务器。
使用Claude桌面版测试服务器
Claude桌面版目前还不支持Linux。
首先,确保你已安装Claude桌面版。 你可以在这里安装最新版本。如果你已经安装了Claude桌面版,请确保它已更新到最新版本。
我们需要为你想使用的MCP服务器配置Claude桌面版。
为此,在文本编辑器中打开你的Claude桌面版App配置文件~/Library/Application Support/Claude/claude_desktop_config.json。
如果文件不存在,请确保创建它。
例如,如果你安装了VS Code:
- MacOS/Linux
- Windows
code ~/Library/Application\ Support/Claude/claude_desktop_config.json
code $env:AppData\Claude\claude_desktop_config.json
然后你将在mcpServers键中添加你的服务器。
只有在至少正确配置了一个服务器时,MCP UI元素才会在Claude桌面版中显示。
在这种情况下,我们将添加我们的单个天气服务器,如下所示:
- MacOS/Linux
- Windows
{
  "mcpServers": {
    "spring-ai-mcp-weather": {
      "command": "java",
      "args": [
        "-Dspring.ai.mcp.server.stdio=true",
        "-jar",
        "/ABSOLUTE/PATH/TO/PARENT/FOLDER/mcp-weather-stdio-server-0.0.1-SNAPSHOT.jar"
      ]
    }
  }
}
{
  "mcpServers": {
    "spring-ai-mcp-weather": {
      "command": "java",
      "args": [
        "-Dspring.ai.mcp.server.transport=STDIO",
        "-jar",
        "C:\\ABSOLUTE\\PATH\\TO\\PARENT\\FOLDER\\weather\\mcp-weather-stdio-server-0.0.1-SNAPSHOT.jar"
      ]
    }
  }
}
确保你传入服务器的绝对路径。
这告诉Claude桌面版:
- 有一个名为"my-weather-server"的MCP服务器
- 通过运行
java -jar /ABSOLUTE/PATH/TO/PARENT/FOLDER/mcp-weather-stdio-server-0.0.1-SNAPSHOT.jar来启动它
保存文件,然后重启Claude桌面版。
使用Kotlin客户端测试服务器
手动创建MCP客户端
使用McpClient连接到服务器:
val stdioParams = ServerParameters.builder("java")
  .args("-jar", "/ABSOLUTE/PATH/TO/PARENT/FOLDER/mcp-weather-stdio-server-0.0.1-SNAPSHOT.jar")
  .build()

val stdioTransport = StdioClientTransport(stdioParams)

val mcpClient = McpClient.sync(stdioTransport).build()

mcpClient.initialize()

val toolsList = mcpClient.listTools()
调用工具:
val weather = mcpClient.callTool(
  CallToolRequest("getWeatherForecastByLocation",
      mapOf("latitude" to "47.6062", "longitude" to "-122.3321")))

val alert = mcpClient.callTool(
  CallToolRequest("getAlerts", mapOf("state" to "NY")))

mcpClient.closeGracefully()
使用MCP客户端Boot Starter
使用spring-ai-starter-mcp-client依赖创建一个新的boot starter应用程序:
dependencies {
    implementation("org.springframework.ai:spring-ai-starter-mcp-client")
}
并将spring.ai.mcp.client.stdio.servers-configuration属性设置为指向你的claude_desktop_config.json。
你可以重用现有的Anthropic Desktop配置:
spring.ai.mcp.client.stdio.servers-configuration=file:PATH/TO/claude_desktop_config.json
当你启动客户端应用程序时,自动配置将从claude_desktop_config.json自动创建MCP客户端。
更多信息,请参见MCP客户端Boot Starters参考文档。
更多Kotlin MCP服务器示例
starter-webflux-server演示了如何使用SSE传输创建MCP服务器。 它展示了如何使用Spring Boot的自动配置功能定义和注册MCP工具、资源和提示。
这是一个基于.NET的快速入门演示。 要了解如何手动创建同步和异步MCP服务器,请参阅C# SDK服务器文档。
让我们开始构建我们的天气服务器! 你可以在这里找到我们将要构建的完整代码。
更多信息,请参见MCP服务器.NET SDK参考文档。
系统要求
- 已安装.NET 7.0或更高版本
- Visual Studio 2022或更高版本(推荐)
设置环境
- 创建一个新的.NET控制台应用程序:
dotnet new console -n WeatherServer
cd WeatherServer
- 添加必要的NuGet包:
dotnet add package Spring.AI.MCP.Server
dotnet add package Spring.AI.MCP.Server.Stdio
- 创建服务器实现:
using Spring.AI.MCP.Server;
using Spring.AI.MCP.Server.Stdio;

class Program
{
    static async Task Main(string[] args)
    {
        var server = new McpServerBuilder()
            .WithStdioTransport()
            .WithToolExecutionHandler(new WeatherToolExecutionHandler())
            .Build();

        await server.StartAsync();
    }
}

public class WeatherToolExecutionHandler : IToolExecutionHandler
{
    private readonly HttpClient _httpClient;

    public WeatherToolExecutionHandler()
    {
        _httpClient = new HttpClient();
        _httpClient.DefaultRequestHeaders.Add("Accept", "application/geo+json");
        _httpClient.DefaultRequestHeaders.Add("User-Agent", "WeatherApiClient/1.0 (your@email.com)");
    }

    public async Task<string> ExecuteToolAsync(string toolName, IDictionary<string, object> parameters)
    {
        return toolName switch
        {
            "getWeatherForecastByLocation" => await GetWeatherForecastAsync(
                Convert.ToDouble(parameters["latitude"]),
                Convert.ToDouble(parameters["longitude"])),
            "getAlerts" => await GetAlertsAsync(parameters["state"].ToString()),
            _ => throw new ArgumentException($"Unknown tool: {toolName}")
        };
    }

    private async Task<string> GetWeatherForecastAsync(double latitude, double longitude)
    {
        // 返回详细预报,包括:
        // - 温度和单位
        // - 风速和方向
        // - 详细预报描述
    }

    private async Task<string> GetAlertsAsync(string state)
    {
        // 返回活动警报,包括:
        // - 事件类型
        // - 受影响地区
        // - 严重程度
        // - 描述
        // - 安全指示
    }
}
- 构建并运行服务器:
dotnet build
dotnet run
让我们现在从现有的MCP主机(Claude桌面版)测试你的服务器。
使用Claude桌面版测试服务器
Claude桌面版目前还不支持Linux。
首先,确保你已安装Claude桌面版。 你可以在这里安装最新版本。如果你已经安装了Claude桌面版,请确保它已更新到最新版本。
我们需要为你想使用的MCP服务器配置Claude桌面版。
为此,在文本编辑器中打开你的Claude桌面版App配置文件~/Library/Application Support/Claude/claude_desktop_config.json。
如果文件不存在,请确保创建它。
例如,如果你安装了VS Code:
- MacOS/Linux
- Windows
code ~/Library/Application\ Support/Claude/claude_desktop_config.json
code $env:AppData\Claude\claude_desktop_config.json
然后你将在mcpServers键中添加你的服务器。
只有在至少正确配置了一个服务器时,MCP UI元素才会在Claude桌面版中显示。
在这种情况下,我们将添加我们的单个天气服务器,如下所示:
- MacOS/Linux
- Windows
{
  "mcpServers": {
    "dotnet-mcp-weather": {
      "command": "dotnet",
      "args": [
        "run",
        "--project",
        "/ABSOLUTE/PATH/TO/PARENT/FOLDER/WeatherServer"
      ]
    }
  }
}
{
  "mcpServers": {
    "dotnet-mcp-weather": {
      "command": "dotnet",
      "args": [
        "run",
        "--project",
        "C:\\ABSOLUTE\\PATH\\TO\\PARENT\\FOLDER\\WeatherServer"
      ]
    }
  }
}
确保你传入服务器的绝对路径。
这告诉Claude桌面版:
- 有一个名为"dotnet-mcp-weather"的MCP服务器
- 通过运行
dotnet run --project /ABSOLUTE/PATH/TO/PARENT/FOLDER/WeatherServer来启动它
保存文件,然后重启Claude桌面版。
使用C#客户端测试服务器
手动创建MCP客户端
使用McpClient连接到服务器:
var stdioParams = new ServerParameters
{
    Command = "dotnet",
    Arguments = new[] { "run", "--project", "/ABSOLUTE/PATH/TO/PARENT/FOLDER/WeatherServer" }
};

var stdioTransport = new StdioClientTransport(stdioParams);
var mcpClient = McpClient.CreateSync(stdioTransport);

await mcpClient.InitializeAsync();

var toolsList = await mcpClient.ListToolsAsync();
调用工具:
var weather = await mcpClient.CallToolAsync(
    new CallToolRequest("getWeatherForecastByLocation",
        new Dictionary<string, object>
        {
            { "latitude", 47.6062 },
            { "longitude", -122.3321 }
        }));

var alert = await mcpClient.CallToolAsync(
    new CallToolRequest("getAlerts",
        new Dictionary<string, object>
        {
            { "state", "NY" }
        }));

await mcpClient.CloseGracefullyAsync();
使用MCP客户端依赖注入
使用Spring.AI.MCP.Client包创建一个新的.NET应用程序:
<PackageReference Include="Spring.AI.MCP.Client" Version="1.0.0" />
并在Program.cs中配置服务:
using Microsoft.Extensions.DependencyInjection;
using Spring.AI.MCP.Client;

var services = new ServiceCollection();
services.AddMcpClient(options =>
{
    options.ServersConfiguration = "file:PATH/TO/claude_desktop_config.json";
});

var serviceProvider = services.BuildServiceProvider();
var mcpClient = serviceProvider.GetRequiredService<IMcpClient>();
当你启动客户端应用程序时,依赖注入将从claude_desktop_config.json自动创建MCP客户端。
更多信息,请参见MCP客户端.NET SDK参考文档。
更多C# MCP服务器示例
starter-webflux-server演示了如何使用SSE传输创建MCP服务器。 它展示了如何使用依赖注入定义和注册MCP工具、资源和提示。